
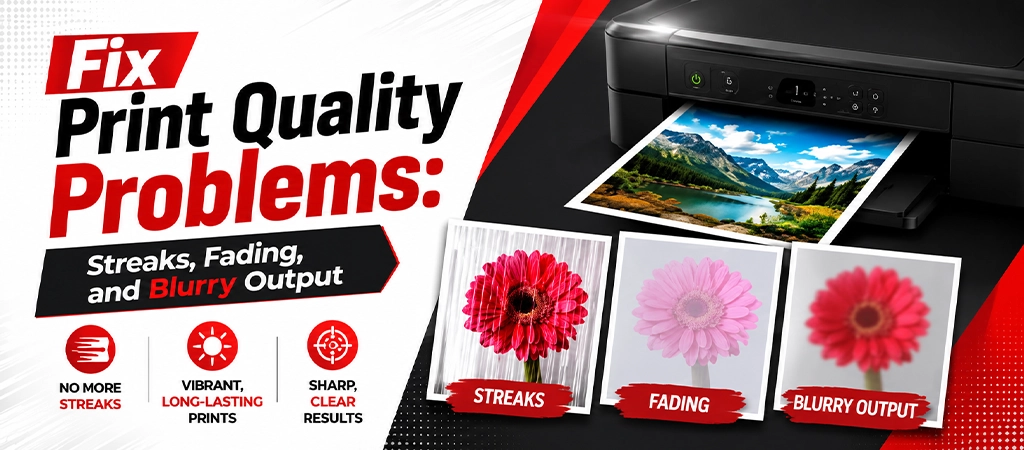
” Start by printing a self-test or nozzle check page from your printer’s Maintenance menu. This diagnostic page reveals which components are causing quality problems. For laser printers: horizontal lines indicate drum or toner issues. Faded output indicates low toner. Smearing indicates fuser failure. For inkjet printers: missing lines indicate clogged nozzles. Faded color indicates low ink. Smearing indicates wet ink or wrong paper type.”
Bad print quality makes your business look unprofessional. When a user sees streaks/fading, they may need to decide if repair is needed. Because they found a crumpled invoice, a smudged contract, and a jumbled presentation, all tarnish your product before you’ve even gotten to the first word. Poor print quality can also be a problem for regulated industries, such as health care or legal, where it can lead to difficulties in compliance when printed records must be easily readable.
Each print problem is caused by a particular problem. This guide will discuss all the major print quality problems for both laser and inkjet printers, along with the proper diagnosis technique and exact solutions for each.
Run a Printer Diagnostic Before Fixing Anything
Print a diagnostic page from your printer before handling any part or ordering any parts. Each of the large printer manufacturers has a built-in self-test, which displays the condition of each component and ink/toner path. If you diagnose first, you don’t have to replace the wrong part. To repair or replace your printer because of poor quality might indicate the printer is aging.
Laser Printer Self-Test
For most laser printers: select Settings or Menu > Reports or Information > Print Configuration Page. On the configuration page you can view the firmware version, the current settings, and importantly, a print quality diagnostic block. If the printer is an HP LaserJet: select Reports > Print Quality Page. On this page, whether lines or banding is present consistently means that it is because of drum wear or a toner distribution issue.
Inkjet Printer Nozzle Check
For most inkjet printers: press Settings or Maintenance > Nozzle Check or Print Head Check. The nozzle checks prints a pattern of lines in each color. The missing lines or gaps will show which ink channels are clogged for each color. This will tell you what nozzles require cleaning before running a cleaning cycle.
Horizontal Lines or Streaks Across the Page
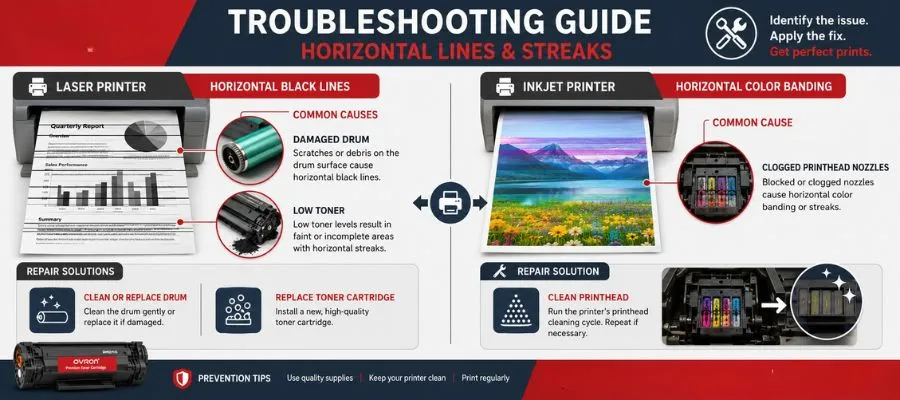
In Laser Printers — Horizontal Lines
Horizontal lines on laser printer output (lines that run across the width of the page, across the direction of printing) are usually caused by one of three problems: the drum unit is scratched or damaged, toner has accumulated on the drum unit, or the toner cartridge is empty and the print mechanism has distributed the toner unevenly.
Take out the toner cartridge and, if it is its own unit, the drum unit. Carefully look at the light green or blue surface of the drum unit in good light. Check for deep scratches, grooves, or dark toners in lines. No scratches can be repaired in a drum; it must be replaced. Light toner buildup on the drum sometimes can be removed by using a dry, lint-free cloth, but never use bare fingers to touch the drum surface, as the skin oils can leave permanent marks on every subsequent print. I
If the drum appears to be in good condition, it’s more likely to be the toner cartridge. Take out the toner cartridge, and rock it gently from side to side 5-6 times to redistribute the toner. Reinstall and print the test page. If lines are clear or decreasing, the cartridge is almost depleted and needs to be replaced soon.
In Inkjet Printers — Horizontal Lines
If your inkjet print is done with horizontal lines or bands, your print head nozzles may be clogged. The specific colors or combinations of nozzles are blocked, and the nozzle marks a line, which is supposed to create a line of ink.
- Execute the Print Head Cleaning utility on the printer’s control panel or the manufacturer’s software in Maintenance.
- When cleaning, print a nozzle check page after cleaning to compare the results to the initial nozzle check.
- Repeat the cleaning cycle if any improvement is seen (some gaps are filled). Use a max of 3 cycles per session.
- More than three cycles running can consume the ink and may not further reduce clogging.
- After 3 cycles, if there are any gaps, the printhead should be cleaned or replaced.
Faded or Light Print Output
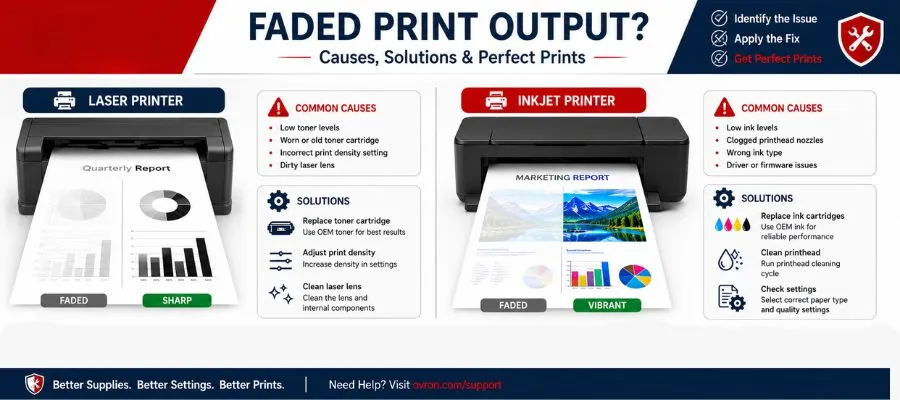
Laser Printer — Faded Output
It’s almost certain that the Toner Cartridge is depleted or low when the laser printer output is faded. The initial repair is to take out the toner cartridge and rock it back and forth 5 to 6 times to resaturate any remaining toner. This will even out settled toner and can help to restore normal output density for another 100-300 pages before the cartridge is truly used up.
If a true replacement is required, only use a new OEM (manufacturer brand) toner cartridge. Third-party refilled or remanufactured cartridges can lead to fading, inconsistent print quality, and ultimately can damage the drum unit. The price of a cheaper cartridge doesn’t save money because the replacement drums are still expensive. printer error codes explained often accompany print quality issues
If output is still light after replacing with a new OEM cartridge, verify the print density setting in the printer driver or on the printer’s control panel. It could be that the setting has been switched to Draft or Economy mode to save on toner and to purposely use less toner.
Inkjet Printer — Faded Output
Faded inkjet output means low ink level or partially clogged nozzles. Use manufacturer’s software to check ink level; most inkjet printers have ink level indicators in the system tray. Replace the cartridge if it is out of ink. If there is sufficient ink but the output is still weak, perform the nozzle check and head cleaning procedure outlined above.
Vertical Lines Down the Page
If there are vertical lines (parallel to top to bottom of page) in laser output, it is due to one of two things.
The first is a line that occurs only at random intervals, e.g., every few inches or in specific locations of the page, which is probably due to a scratch on the drum surface moving in the direction of drum rotation, or a piece of debris caught on a feed roller that marks the drum surface with ink on every rotation. Examine the drum surface to see if there is a scratch or groove.
Second, if the line is always the same distance from the top, the top of the line is always the same distance from the drum’s surface (the drum surface rotates about once every 3 to 4 inches of paper). There is a defect in the surface of the drum that occurs with each rotation, this is called a rotation mark. The drum set must be replaced.
Vertical lines are a sign of a particular nozzle being blocked in inkjet printers — one ink channel that is being omitted every time the other ink channels are printing. This will be represented on the nozzle check page as an individual blank row in the test pattern. Use head cleaning cycles that are more specific to that color channel.
Smearing and Smudging
Laser Printer — Smearing
Smudging is a print problem that occurs when printed text or graphics smears when people rub a finger over the print. Smearing is a sign that the fuser unit is failing or it has failed. The fuser is used to melt and press the toner onto the paper so that it will be permanently attached. If the fuser fails to heat up to the appropriate temperature or if the application of the pressure is inadequate, the toner will lie on the paper surface without fusing, and will smear when the paper is handled.
If the fuser fails, it can only be replaced. Certified technician job – Fuser replacement. The fuser is heated to 180°C – 230°C and components have high spring tension. Avoid replacing a fuser without the proper training and equipment.
Inkjet Printer — Smearing
Smearing refers to ink flowing from the ink jet printer onto the paper before drying and is caused by the wet ink getting into contact with the print mechanism before it dries. There are three common causes: using a paper type setting that does not match the paper (glossy or coated papers dry slower than some print settings), printing in high humidity, and print density being set too high (excess ink; the paper will not absorb the ink quickly enough).
Fix: Set the paper type in the print driver to the same type as you are printing on. Outline the choices for choosing paper: Glossy or photo paper (not plain). If the output is very saturated, decrease the density or quality of the prints. In high humidity, let printed pages dry for 30 seconds before stacking when smearing occurs.
Blurry or Out-of-Focus Output
In laser and inkjet printers, there are various issues that cause text or images to be blurred or out of focus.
Laser Printer — Blurry Output
Laser output that is blurry is uncommon; laser printers are designed to present sharp edges. The most common causes for fuzzy or blurred images are either a worn or old drum unit (as the drum surface gets worn, the electrostatic image it produces also gets fuzzy and blurred) or moisture in the paper (soaked paper holds toner differently, resulting in slightly fuzzy edges).
Inkjet Printer — Blurry Output
Most likely a print head alignment issue if it is blurry inkjet output. The print head repeats the process in multiple passes, and if the alignment of passes is off, the ink dots will not align exactly, resulting in fuzzy edges. Use the Print Head Alignment utility on the printer’s Maintenance menu to print a test pattern, determine the pattern’s alignment, and correct the print head position automatically or interactively with the user.
Color Problems — Wrong Colors or Missing Colors
For color laser printers: If a particular color is not appearing or is incorrect (for example, all colors are showing up too cyan, or all reds are showing up as oranges), inspect the color cartridge for that color. The color laser printers have four separate toners, one black, one cyan, one magenta, and one yellow. If any of the cartridges is empty or not properly inserted in the printer, it will affect the color balance of all output. Take out and plug in the cartridge. Replace any that are depleted. If quality is unfixable, guide them to buy a new one, the best printers for business 2026.
For inkjet printers: The nozzle check page is immediately used to determine which colors are weak or missing from the printer. Use the head cleaning steps for the missing colors listed below. The indicator is sometimes not accurate; a color might not be showing even after 3 cleaning cycles, if this is the case then the color may be empty. Change the cartridge that is missing colored ink.
Print Quality Maintenance — Prevention Checklist
| Maintenance Action | Frequency | What It Prevents |
|---|---|---|
| Run nozzle check (inkjet) | Monthly | Catches clogged nozzles before they worsen |
| Clean print heads (inkjet) | When nozzle check shows gaps | Clears early-stage clogging before permanent blockage |
| Rock toner cartridge gently (laser) | When fading begins | Extends cartridge life and restores density |
| Run print head alignment (inkjet) | After moving printer or changing cartridges | Prevents blurry or banded output |
| Clean inside printer with dry cloth | Quarterly | Removes toner dust that causes streaks |
| Check drum unit counter (laser) | Monthly | Replaces drum before wear-related streaks begin |
| Professional cleaning and inspection | Every 12-18 months | Catches component wear before print quality degrades |
Frequently Asked Questions
If lines persist after replacing the toner cartridge with a genuine OEM cartridge, the drum unit is the cause. The drum unit and toner cartridge are separate components in most laser printers. Replace the drum unit — it is the component with the green or blue photosensitive surface.
Full ink cartridges with blank output indicate severely clogged print head nozzles. The ink cannot pass through the blocked nozzles to reach the paper. Run 3 head cleaning cycles from the Maintenance menu. If still blank, perform a deep cleaning soak: power off the printer, remove the print head (if removable on your model), and soak it in warm distilled water for 20 minutes. If blank output continues after this, the print head needs replacement.
Yes. Paper that is below the printer’s specified weight, has surface coating incompatible with the printer’s ink or toner type, or is stored in humid conditions causes multiple quality problems: toner does not adhere properly, ink absorbs unevenly, paper fibers cause streaks in laser printing, and smearing occurs in inkjet printing. Use paper within the manufacturer’s specified weight range, stored in dry conditions.
Conclusion
Streaks, faded text, smudging, blurry output, and missing colors are just some of the common printer print quality issues you can solve in a matter of minutes once you know what’s causing them. Outdated drivers cause print quality problems. The diagnostic test page will help determine if the problem is caused by low toner, clogged print heads, clogged drum units, or other printer problems. Common issues can be avoided if you do regular maintenance like checking the nozzle, cleaning the print head, and replacing the toner or ink cartridges on time. If you have found that even basic troubleshooting steps are not enough to fix print quality problems, professional servicing could be required to get your printer working again. If you know the proper diagnosis and repair procedures, you can get clear, professional-quality prints and prolong the life of your printer.
Table of Contents


